At last count there are 61 - count them 61 - Blogs of Note in the sidebar. And here I thought I had nothing to read.
Here's the thing: if a blogger doesn't update pretty frequently, they lose readers. It's just the way of the world. So as of January 1st if a blogger in the list hasn't updated in at least 6 months, then I'm dropping them. I know life gets in the way and dealing with things offline takes precedence over online stuff. But throw me a frickin' bone here, people.
So happy new year and hope to see you soon.
Poor Baby
The youngest of my progeny has a baby doll. This doll came from the Dollar Tree, so it's not like we have a whole lot invested in it. Except for the fact that my son LOVES this baby doll. And there's nothing wrong with that.
Except for the fact that Baby was bursting at the seams! In fact, Baby has been bursting at the seams for quite some time. I've tried new zip ties to keep it's head on to no avail since the neck casing basically was disintegrating. So what do you do? You go back to the Dollar Tree to find a replacement Baby. But when you get there, you realize that the Babies there aren't as nice as the one you bought 3 years ago. No indeedy. THIS Baby has sleepy eyes that open and close and a pretty face. The newer Babies have painted on eyes and smushed faces. So you go home, pray that Baby stays together another year or two and then you can put it away in the keepsake box.
 |
| Poor Baby! |
 |
| Baby has gone to pieces! |
HAH. Good luck with that. So eventually Baby starts to really go to pieces. And you, as the Good Mama™ that you are pull out a couple pieces of cardstock, disembowel Baby and make a pattern from the remains of the cloth body. This part is the easiest part. Really. I used fuschia cardstock and a pencil and some spray adhesive which I'm STILL picking off my fingers. Baby was constructed of five vinyl pieces and four fabric sections: body front, body upper back, body lower back and neckband. The pattern pieces were rough outlines drawn on the fold because I'm lazy like that and like to use the fold whenever possible.
 |
| Baby got a [new] back! |
The How To:
1. Sew the upper back and lower back together with 1/4" seam. This makes Baby's butt-tocks.
2. Sew back to front with 1/4" seam. Match the crotch and armpits and ease everything else to that. It doesn't have to be perfect. <--- Advice to myself. Leave one shoulder unsewn.
3. Fold the neckband in half lengthwise and sew a 1/4" seam. Then attach to neckhole starting from one open shoulder and easing around the opening.
4. Sew across the bottom of the legs. This is important because it's how you're going to attach the feet.
5. PANIC because you're out of the right size zip ties AND hand sewing needles.
6. Breathe in and out a few times slowly and raid your oldest child's sewing box to find hand sewing needles.
7. Put the feet INSIDE the body that is still wrong side out. Attach the feet the old skool way by sewing them in rather than using zip ties. This means that you're going to take a few stitches every so often and then pull that sucker tight and then wrap the thread around the groove about 4 or 5 times then secure with about 10 knots in various places.
Did I mention that I haven't made a doll like this since I was uh... TWELVE????
Did I mention that I haven't made a doll like this since I was uh... TWELVE????
8. Turn the body right side out except for the arms. Shove the hands inside and then fold the raw edges over so that you can see the vinyl arm opening. Take that hand needle with a nice long piece of thread and sew *through* the vinyl and fabric to attach the arms like they were originally. Bonus points for you if you A) use a thimble to keep from impaling your thumb and B) use the existing holes! Why reinvent the wheel, right?
9. Pull the arms out so the body looks almost normal and stuff that sucker with the original stuffing.
10. Freak out because you don't have the right size zip tie to put the head back on.
11. Put the head on the same way you did the feet. Gather the opening up with thread, making darn sure that it's tight because the LAST thing you want to happen is Baby's head popping off after a session of "loving" play.
 |
| Baby's got a new booooody! |
12. Take a picture of the final product and post to your blog before handing Baby back to child.
13. Listen to the cherubic "Thank you Mama for fixing Baby!!!" and smile knowing that you're Good Mama™ for at least another 5 minutes until you don't let them eat unlimited fruitcake and cookies.
And there's nothing wrong with that!
And there's nothing wrong with that!
New Year, New Leaf
or something like that. I know it's been for almost stinking ever that I've blogged regularly. Mea culpa, dear readers. All two of you. ;-)
To catch you all up on what's been going on, we've had a round robin of sickness including confirmed flu *and* strep over the last three weeks. So I think that buys me a "get out of blogging free" card, right? This is going to be picture light and text heavy, so grab a cup of tea and put your feet up.
We made it through Christmas and the pyjamas/house clothes were a huge hit as always. I've got a couple of sewing contracts coming up in the next two weeks, so I've got to get on that, but before I go there, I really, REALLY want to get my sewing space set. If I could, I'd kick my son out of his room (my old sewing room) and be done with it, but there's no other room in the house that can hold his massive collection of Thomas trains, so there you have it. My dad used to make fun of how many Barbies I had as a girl, but this boy? More Thomas than I ever had Barbies. We counted locomotives last night. There are 17. Each one with at LEAST one coal tender and most have another car after that. And we won't go into how many pieces of track there are. No, we just won't. I promise I'll take pictures once I'm done with the furniture rearranging in there.
Which leads me to my newest project. By way of the Kitchen God. As you may know, my better half is half Chinese. So we pay a little homage to his ancestry by quasi-following some traditions. Most notably is Chinese New Year and angpao. I was explaining to my oldest child the other day about the Kitchen God and Chinese New Year and out with the old, in with the new, etc. For the Chinese, that happens later on, but for us on the whatever it is calendar we use (Julian?) it starts Jan 1. So combining the tradition of clearing out the old to usher in the new (it's like "spring cleaning" except it's Darn Cold) and New Year's Resolutions (or goals as we call them) leads to moving furniture around (getting our chi right), cleaning up the detritus of the holiday and overall clearing the foggy spaces in my head.
I moved the armoire from the front hall to the boy's bedroom. He was starting to need his own closet space anyway and the armoire was too bulky for the front hall. Which led me to have to go through all the c.r.a.p. inside it. Which meant my LPs moved into the office which meant my fabric in space bags moved to the floor and the homeschool stuff in the armoire is ALSO on the floor, but sorted into piles of donate, sell & keep. Despite that, the front hall looks actually CLEANER than it did before. I'll be taking ONE room at a time - thank God for small houses! - and working from front to back in time for New Year's. And if I don't make it by January 1, I can still make it by Chinese New Year. Which is apparently February 3rd and is the Year of the Rabbit. Which according to http://www.theholidayspot.com/chinese_new_year/ is "A placid year, very much welcomed and needed after the ferocious year of the Tiger. We should go off to some quiet spot to lick our wounds and get some rest after all the battles of the previous year.". You know what? I think they're on to something. Because the Year of the Tiger just about kicked my sorry backside.
Anyways, here I am, almost one "room" done. To remind you of how small our house is, there is from front to back: front hall/office (used to be one space), living room, dining room, kitchen. that's the left half of the house. The right half is long hallway with bathroom at end and three rooms that open off said hallway. From back to front: kids' rooms (2 connecting rooms) and our room. That's it folks, one tiny house. I could count the back porch since it's our laundry "room", but I won't. I only use it when the weather is good.
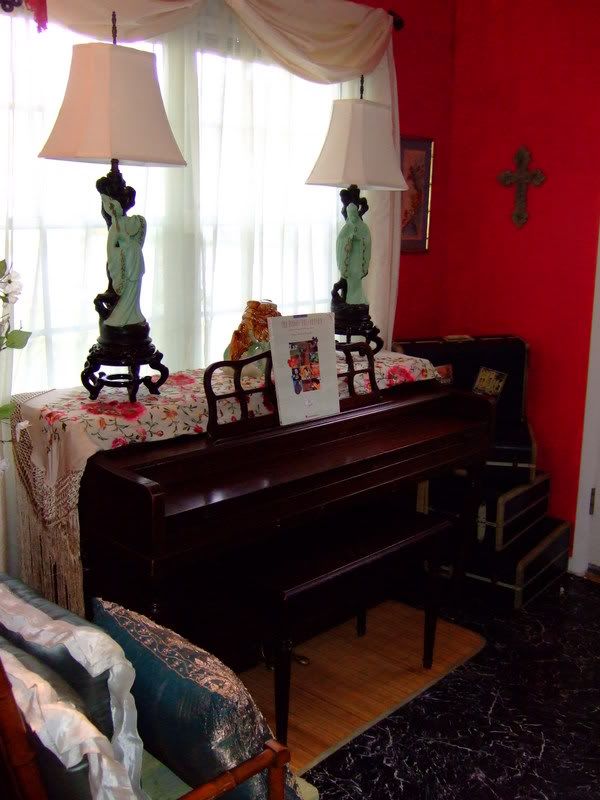
So today is front hall day. I've got my messes sorted into neat piles. Which for the ADD person is the equivalent of Martha Stewart's best organizational skillz. I'm in the process of clearing the flat surfaces (piano, console, stereo) of c.r.a.p. I've got ADD, so if stuff starts to pile up on a flat surface, I just don't see it until it starts to slide into the floor in a heap. This is why I HATE tchotchkies. And I mean HATE. My mom, on the other hand, has all kinds of that sit-aroundy stuff and is able to keep it neat as a pin. She totally doesn't get that I can't STAND having little bits of stuff because my brain sees ALL of it as c.r.a.p. So the fancy dancy candy dish and the pile of receipts and keys and cell phone all look the same to me. Ergo, nothing sitting out = looks good. I've managed the console and the piano top. And I might finish the stereo, but I'm not sure. But that gives you an idea of what I'm up against.
After all that, the office (pit of despair) should be up next, but I think I might have to save it until next week. The living and dining rooms aren't terrible and will take wayyyyyy less time and give me much more satisfaction. As will the bathroom. It's in great shape considering that 5 people share one tiny bathroom. And one of those 5 is only 4 years old and still working on peeing standing up. We won't talk about the kids' rooms. Part of it is my fault for not putting the shelves and stuff back on the walls after moving the kids around.
But this year? All the Christmas Decor will make it's way to the garage instead of hanging out in the dining room all year. See? An improvement already!
To catch you all up on what's been going on, we've had a round robin of sickness including confirmed flu *and* strep over the last three weeks. So I think that buys me a "get out of blogging free" card, right? This is going to be picture light and text heavy, so grab a cup of tea and put your feet up.
We made it through Christmas and the pyjamas/house clothes were a huge hit as always. I've got a couple of sewing contracts coming up in the next two weeks, so I've got to get on that, but before I go there, I really, REALLY want to get my sewing space set. If I could, I'd kick my son out of his room (my old sewing room) and be done with it, but there's no other room in the house that can hold his massive collection of Thomas trains, so there you have it. My dad used to make fun of how many Barbies I had as a girl, but this boy? More Thomas than I ever had Barbies. We counted locomotives last night. There are 17. Each one with at LEAST one coal tender and most have another car after that. And we won't go into how many pieces of track there are. No, we just won't. I promise I'll take pictures once I'm done with the furniture rearranging in there.
Which leads me to my newest project. By way of the Kitchen God. As you may know, my better half is half Chinese. So we pay a little homage to his ancestry by quasi-following some traditions. Most notably is Chinese New Year and angpao. I was explaining to my oldest child the other day about the Kitchen God and Chinese New Year and out with the old, in with the new, etc. For the Chinese, that happens later on, but for us on the whatever it is calendar we use (Julian?) it starts Jan 1. So combining the tradition of clearing out the old to usher in the new (it's like "spring cleaning" except it's Darn Cold) and New Year's Resolutions (or goals as we call them) leads to moving furniture around (getting our chi right), cleaning up the detritus of the holiday and overall clearing the foggy spaces in my head.
I moved the armoire from the front hall to the boy's bedroom. He was starting to need his own closet space anyway and the armoire was too bulky for the front hall. Which led me to have to go through all the c.r.a.p. inside it. Which meant my LPs moved into the office which meant my fabric in space bags moved to the floor and the homeschool stuff in the armoire is ALSO on the floor, but sorted into piles of donate, sell & keep. Despite that, the front hall looks actually CLEANER than it did before. I'll be taking ONE room at a time - thank God for small houses! - and working from front to back in time for New Year's. And if I don't make it by January 1, I can still make it by Chinese New Year. Which is apparently February 3rd and is the Year of the Rabbit. Which according to http://www.theholidayspot.com/chinese_new_year/ is "A placid year, very much welcomed and needed after the ferocious year of the Tiger. We should go off to some quiet spot to lick our wounds and get some rest after all the battles of the previous year.". You know what? I think they're on to something. Because the Year of the Tiger just about kicked my sorry backside.
Anyways, here I am, almost one "room" done. To remind you of how small our house is, there is from front to back: front hall/office (used to be one space), living room, dining room, kitchen. that's the left half of the house. The right half is long hallway with bathroom at end and three rooms that open off said hallway. From back to front: kids' rooms (2 connecting rooms) and our room. That's it folks, one tiny house. I could count the back porch since it's our laundry "room", but I won't. I only use it when the weather is good.
So today is front hall day. I've got my messes sorted into neat piles. Which for the ADD person is the equivalent of Martha Stewart's best organizational skillz. I'm in the process of clearing the flat surfaces (piano, console, stereo) of c.r.a.p. I've got ADD, so if stuff starts to pile up on a flat surface, I just don't see it until it starts to slide into the floor in a heap. This is why I HATE tchotchkies. And I mean HATE. My mom, on the other hand, has all kinds of that sit-aroundy stuff and is able to keep it neat as a pin. She totally doesn't get that I can't STAND having little bits of stuff because my brain sees ALL of it as c.r.a.p. So the fancy dancy candy dish and the pile of receipts and keys and cell phone all look the same to me. Ergo, nothing sitting out = looks good. I've managed the console and the piano top. And I might finish the stereo, but I'm not sure. But that gives you an idea of what I'm up against.
After all that, the office (pit of despair) should be up next, but I think I might have to save it until next week. The living and dining rooms aren't terrible and will take wayyyyyy less time and give me much more satisfaction. As will the bathroom. It's in great shape considering that 5 people share one tiny bathroom. And one of those 5 is only 4 years old and still working on peeing standing up. We won't talk about the kids' rooms. Part of it is my fault for not putting the shelves and stuff back on the walls after moving the kids around.
But this year? All the Christmas Decor will make it's way to the garage instead of hanging out in the dining room all year. See? An improvement already!
Mom, there's a wormhole in my backpack!
At least that's my assumption these days. And it's a waaaaay better excuse for forgetting homework than the lame-o "the dog ate my homework" cliche.

Due to my oldest child's medical diagnosis of ADHD, she has in place a 504 Plan with her elementary school. Among the accomodations listed are for her math homework to be emailed to ME and I will hand her the relevant pages from her workbook which is now kept at home. Said child is getting BETTER about writing down or at least memorizing the math sheet of the day, but we're still working on her planner.
Ideally, she should be writing her assignments in the planner issued to her by the school. But we don't live in a Utopian society. Or even Lake Wobegon, for that matter.
Today's email exchange:
Dear Awesome Teacher:
Gabriella said they didn't have any math yesterday that she remembered. What is the homework for this week?
Dear Mrs. Sulu:
She should be writing it in her planner everyday as well. Yesterday Ms. Intern verified that she did, but I did not see her planner today.
Dear Awesome Teacher:
The planner "disappeared" but then "reappeared" in her backpack. I'm assuming there's some sort of space/time anomaly regarding her backpack. It's really the ONLY plausible explanation since gremlins are right out.
She'll have 125 AND 127 for class tomorrow. Whether or not the wormhole that exists in her backpack will divulge the papers is another story all together.
Live Long & Prosper,Here's the thing, if I didn't laugh about this, I'd cry. And really, any excuse to use the phrase "space/time anomaly" does my little GeekMom™ heart good.
Mrs. Sulu
The Ariel Cosplay!
I'm so thrilled that the artist, Mirian, who inspired the look dropped by! Here's the costume in it's entirety:


I know the boots aren't really all that visible, but I made my best effort to recreate Mirian's work in fabric.
Tūt Tuesday – Cosplay for Halloween
This year for Halloween, my oldest child has decided she wants to dress up as Ariel. Which is no real surprise. She lurves her some Ariel. But the same-old same-old fins and a bikini top were just not going to happen here. So after Googling for some inspiration, I found this picture at DeviantArt.com.
 What makes this doubly cool is that not only is it Ariel with a Lara Croft twist, my daughter LOVES rpgs. Kingdom Hearts, specifically. So this is what Ariel would look like if she were the heroine of Kingdom Hearts. WIN! Until my daughter informed me that she would need the Crabclaw Keyblade.
What makes this doubly cool is that not only is it Ariel with a Lara Croft twist, my daughter LOVES rpgs. Kingdom Hearts, specifically. So this is what Ariel would look like if she were the heroine of Kingdom Hearts. WIN! Until my daughter informed me that she would need the Crabclaw Keyblade.GREAT! At least I’ve got about 6 weeks to scratch build it. I’m not a cosplayer, so this is uncharted territory for me. Don’t get me wrong, I LOVE cosplay, I just have never done it myself. So the next few tūts are going to be related to the Halloween costume. On with the tūt!

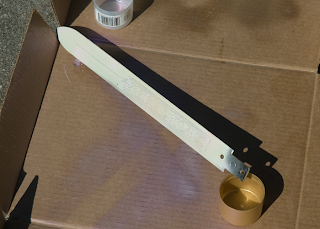
Like George Foreman isn’t going to pay a lot for a Meineke muffler, I’m not going to pay a lot for a costume prop. For an eight year old. I wouldn’t even do it for myself! So after a trip to the local Dollar Tree ($4) which included earbud covers for her Christmas gift and my local craft store ($11) I called it a day. I figure $13 is good enough for a custom weapon and parts of main costume.
I scored:
- Plastic sword - $1
- Disney princess chain bracelet with Ariel - $1
- 2 pack of mermaids - $1
- 2 cans of Valspar touch up paint in pink pearl/gold - 2@$1.99
- 3 sheets of self adhesive glitter foam - 3@$1.49
- 1 shell wooden thingy - 29¢
- 1 crab wooden thingy - 29¢

Step One – Cut a hole in the box
I scanned the crab into Photoshop at 200%, selected the crab image, deleted the background, put a 5px stroke around the crab image and printed it out to use as a template. Cut TWO from the RED glitter foam and set aside. Repeat the process for the shell. The size of your finished shell will depend largely on the size of your sword. In this case, size DOES matter.

Step Two – There’s so much we can do
Take the sword outside and spray the HILT only, the little mermaids and the chain from the bracelet only GOLD. Let them dry WELL. While they are drying, take the wooden shell and cut out TWO from the BLUE glitter foam. Set aside the shell template for later. You’ll use that again on the costume. Cut two larger shells from the template you made in the computer. Set aside. Once the sword is dry, spray the BLADE only with the pink pearl paint. I lucked out that my sword came apart by unscrewing 3 screws on the back side.

Step Three – It’s just you and me
Attach the crab and small shells to the blade and chain respectively. Match up the edges and use the self-adhesive of the foam to adhere it. I made a tiny hole using the pointy end of my trust Cinderella mechanical pencil and then made a slit to allow the chain through. Once the chain was inserted, I used a teeny dab of superglue to hold it together.


Step four – I can give you more
MUCH, much more! Check back next Tuesday for the boots! Meanwhile, check out the finished product!

UFOs
or Unfinished Fabric Objects
They lurk in every sew-person's stash. They hide in obscure places waiting to jump out at you and stick you with a straight pin when you least expect it.
Today, my UFOs were put on notice: "You will be complete. Yes, you will."
I've taken the pledge not to begin one more sewing project until all my UFOs are dealt with appropriately. I'm only a little bummed about this because I wanted a spiffy new outfit for our 10th anniversary dinner tomorrow night but oh well.
Here's my list (in no particular order):
1.Denim skirt repair
2.Denim skirt finish
3.Flannel jumper finish - for Fall
4.Crib blanket finish - post to Etsy - needs blanket binding
5.Captain Jack Sparrow t-shirt finish
6.Hem Gabriella's jeans
7.Replace Lorenzo's button - needs buttons
8.Batik blouse finish
9.Girls' sundresses finish
10.Boy's pjs finish - for Christmas
11.Kids' robes finish
12.Kids' t-shirt refashion/transfers - for Christmas - need measurements
I've cleared three UFOs last night - some machine embroidery for the kids' Christmas gifts.
They lurk in every sew-person's stash. They hide in obscure places waiting to jump out at you and stick you with a straight pin when you least expect it.
Today, my UFOs were put on notice: "You will be complete. Yes, you will."
I've taken the pledge not to begin one more sewing project until all my UFOs are dealt with appropriately. I'm only a little bummed about this because I wanted a spiffy new outfit for our 10th anniversary dinner tomorrow night but oh well.
I solemnly pledge not to begin any new projects until these are finished or lower in priority.
Here's my list (in no particular order):
1.Denim skirt repair
2.Denim skirt finish
3.Flannel jumper finish - for Fall
4.Crib blanket finish - post to Etsy - needs blanket binding
5.Captain Jack Sparrow t-shirt finish
6.Hem Gabriella's jeans
7.Replace Lorenzo's button - needs buttons
8.Batik blouse finish
9.Girls' sundresses finish
10.Boy's pjs finish - for Christmas
11.Kids' robes finish
12.Kids' t-shirt refashion/transfers - for Christmas - need measurements
I've cleared three UFOs last night - some machine embroidery for the kids' Christmas gifts.
Why, yes, yes I am a GeekMom™
Our oldest child has ADD. To say that getting her to remember even the basics like "turn in the homework that Mom sat with you to help you finish" and "bring home your homework assignments, lunchbox and anything that you wore to school today" has been a challenge to say the least... Well, my friends, it's the understatement of the millenium.
So I made her a checklist. I shall laminate it so that it doesn't get all nasty. You wanna see it? You KNOW you want to. It's Geekalicious™. Jen at Epbot, this one's for you.
You think this will help? I might cut the PipBoy3000 out for added effect. What say you?
Okay, so I went ahead and trimmed it and laminated it. Here's the finished article:

So I made her a checklist. I shall laminate it so that it doesn't get all nasty. You wanna see it? You KNOW you want to. It's Geekalicious™. Jen at Epbot, this one's for you.
 |
| PipBoy3000 Elementary School Edition |
Okay, so I went ahead and trimmed it and laminated it. Here's the finished article:

I changed the font color so it would show up better on the black background.
Ask and it shall be given!
Yesterday was the rye-less rye bread test, courtesy of the Gluten Free Goddess. It came out well, I think. The bread is slightly crumbly, but overall it tastes like rye bread and makes a great pastrami sandwich.

On my other blog, I have a feature called Fortune Cookie Friday where I post the wisdom found in a fortune cookie. On Fridays. Which is all well and good when you can eat the fortune cookies. I love fortune cookies. But fortune cookies have gluten. Which means my trips to the Panda Express are going to be limited in the future. So I thought to myself, what am I going to do? How am I ever, ever going to be able to do another FCF if I can't have fortune cookies? Never mind the fact that I don't HAVE to eat the cookies and I won't break out in hives if I touch one... So I thought to myself (again), I bet I can conjure up a recipe. That's the ticket! But then, I thought some more and said, Just let me Google it first. I bet someone else has ALREADY done the work for me! And they have. Over at Celiac.com, there's a recipe for Gluten-Free Chinese Fortune Cookies. Too bad they don't come with the fortunes already. Oh well... At least I can still steal my kids' fortunes and post them. :-)

On my other blog, I have a feature called Fortune Cookie Friday where I post the wisdom found in a fortune cookie. On Fridays. Which is all well and good when you can eat the fortune cookies. I love fortune cookies. But fortune cookies have gluten. Which means my trips to the Panda Express are going to be limited in the future. So I thought to myself, what am I going to do? How am I ever, ever going to be able to do another FCF if I can't have fortune cookies? Never mind the fact that I don't HAVE to eat the cookies and I won't break out in hives if I touch one... So I thought to myself (again), I bet I can conjure up a recipe. That's the ticket! But then, I thought some more and said, Just let me Google it first. I bet someone else has ALREADY done the work for me! And they have. Over at Celiac.com, there's a recipe for Gluten-Free Chinese Fortune Cookies. Too bad they don't come with the fortunes already. Oh well... At least I can still steal my kids' fortunes and post them. :-)
First things first
My apoligies for not updating sooner. I've been away for the entire summer and then school started and we're just getting back into the groove. Bewaaaaaaaaaaare the groooooooove!
As you may have noticed, the blog background has changed! I noticed this for the first time today when my spiffy background, courtesy of The Cutest Blog on the Block, was MISSING. Since I had to track down my background and reinstall it anyway, I figured it was time for a change. And let's be honest, the other background was just a little too foofy for my taste but at the time was the best I could do.
How do you like the new background?
In other news, I learned that I'm gluten intolerant. While I haven't had the testing done to see if it's full-blow Celiac's Disease, my doctor has warned me to not eat gluten. So one thing you'll see a lot more of are posts about my adventures in gluten-free baking. Right now, I've got my first-ever loaf of gluten-free anything in the oven. It's from the Gluten-Free Goddess and it's a rye-less rye bread. This had to be my first thing to try because I'm a serious fan of a Reuben sandwich. And since my eldest child is off gluten thanks to her ADD diagnosis - which I know hasn't been "proven" in a double-blind controlled study - it's just easier for everyone to eat what I eat. We'll see how it tastes. I've got pastrami in the fridge waiting for bread.

Favorite Jeans + holes in the crotch =
a major refashion!
SRSLY, what's a girl to do, right? You've got this favorite pair of jeans and they've been worn to DEATH but you just can't let them go...

In my case, it's a pair of Converse One Star from Target that set me back ~$30 2 or 3 years ago. I know, right? But the fabric was just sooooooo sooooooft. So today, I gathered all the get up and go I could muster and headed to the Local Mega Fabric Mart for some microsuede and some pleather. I know, I know PLEATHER. But really, when used tastefully and in small amounts, it's really not all that heinous. I promise. See?

What I did:
- Cut the legs open on the inseams
- Cut off the belt loops
- Cut microsuede on the bias in two long triangles and sew in the space between the legs to fill in
- Cut pleather on bias for hem binding and new waistband
- Sew using a zigzag stitch and a denim needle
I bet you never knew
that a preschool learning activity is also recycling! Bonus points if you did know.
One of my all time favorite activities from my days as a preschool teacher was taking broken crayons (Leftolas) and melting them into custom crayons. How it works is you get all the broken crayons together - and believe me, with 15 littles aged 2-5, you're GOING to have broken crayons - and then sort them by color family. Take a paper (not plastic!) cup - waxed preferred, put each kid's name on a cup and let them put their favorite colors in the cup. Then, you put the cups on a cookie sheet, toss it in the oven @ 350 for 4 or 5 minutes or so. When they're done, you take the whole affair out, open all the windows and doors to air out the room and then wait for them to cool. Once they've cooled, peel the cups off and there you have it: little crayon disks.

So when Crayola came out with the Crayon Maker toy back in 2002, I wanted one so badly I could taste it. But I wasn't going to part with my hard earned money ($25 or so) for a glorified Easy Bake Oven for crayons. This past Christmas, the local Fabric Mega Store had the "new" version which only made MINI crayons for $30 that I coulda got for 50% off, but who wants MINI crayons???? If I my kids wanted mini crayons, they'd color with the broken ones, ya know? So when I hit my local Goodwill this week, what did my wondering eyes spy but the 2002 model for $4.99?! SCORE!!! 60 watt candelabra bulb included!
So this afternoon, the girls and I sat on the dining room floor and peeled all the leftolas and started up the crayon maker. And there were quite a few little leftolas to peel!
 After one round of heating, the glitter/metallic Crayolas didn't want to melt, so I cranked it for a second round to get them nice and warm and melty. The standard Crayolas melted just fine, though. The only hitch to this wondrous contraption is that you MUST use Crayola brand crayons. And I'm fine with that. I'm a bit of a crayon snob anyhow. I refuse to use anything BUT Crayola crayons. They've got the smoothest feel and the deepest pigment of any brand. And getting a pack of 8 for 12¢ on clearance just can't be beat.

Observations from the Peanut Gallery:
Oldest Daughter: So changing the ingredients changes the melt time! Even though the are the same brand, the melt times are different because the metallic ones have an added ingredient! COOL!
One of my all time favorite activities from my days as a preschool teacher was taking broken crayons (Leftolas) and melting them into custom crayons. How it works is you get all the broken crayons together - and believe me, with 15 littles aged 2-5, you're GOING to have broken crayons - and then sort them by color family. Take a paper (not plastic!) cup - waxed preferred, put each kid's name on a cup and let them put their favorite colors in the cup. Then, you put the cups on a cookie sheet, toss it in the oven @ 350 for 4 or 5 minutes or so. When they're done, you take the whole affair out, open all the windows and doors to air out the room and then wait for them to cool. Once they've cooled, peel the cups off and there you have it: little crayon disks.

So when Crayola came out with the Crayon Maker toy back in 2002, I wanted one so badly I could taste it. But I wasn't going to part with my hard earned money ($25 or so) for a glorified Easy Bake Oven for crayons. This past Christmas, the local Fabric Mega Store had the "new" version which only made MINI crayons for $30 that I coulda got for 50% off, but who wants MINI crayons???? If
So this afternoon, the girls and I sat on the dining room floor and peeled all the leftolas and started up the crayon maker. And there were quite a few little leftolas to peel!


Observations from the Peanut Gallery:
Oldest Daughter: So changing the ingredients changes the melt time! Even though the are the same brand, the melt times are different because the metallic ones have an added ingredient! COOL!
So I had this scheme all laid out...
And like every other one of my hare-brained schemes, it came to naught.
I'd planned on posting my cleaning bonanza as a pictorial thingumy and well, you know what they say about the best laid plans of mice and men, right? So anyhow, I got caught up on the laundry and stuff and all of the sudden, out of the blue, I started ironing. Yeah!
And then I got the sewing area sorted out. And then the dining room. And then the bathroom and the bedroom. I was so industrious that I sorted my drawers and closet and filled up a huge bin with clothes to take to the charity shop. I tidied up the living room, ditched the ruined rug and generally got it all squared away.
As I mentioned on my facebook wall, if I didn't know better, I'd say I was nesting. At any rate, the plan of going area by area to get it all tidied before our trip is nicely out of whack. At first, I was beating myself up because I wasn't doing it in "order". But the reality is that doing it this way is more organic and peaceful for me. Attacking each area as it arises doesn't feel forced or contrived.
And while it's not perfect - and I don't ever expect it to be this side of heaven - I'm happy with it. I'm finding the oddest times to carve out a moment to take care of the "little" jobs: scouring the tub/shower happened last night at 11:30. Laundry got tossed in after that and switched over this morning. Yesterday afternoon between my work and picking up the kids from school, I did a load of sheets and remade the bed. Today I folded laundry while watching a documentary - Wild China - on Netflix. Yesterday while the kids were in the bathtub, I mopped the bathroom floor. While my oldest kid was at CCD, I cleared off my dresser.
Now I'm no expert, and I've been subscribed to FlyLady since 2002, but I'm just not good with a "schedule". I don't know if it's the ADD or what. Having a rigid schedule just kills me. But fitting things into my outside commitments? For some reason, that's easier.
Cross your fingers that the roll I'm on stays rolling. I'm a lot happier when my environment is pleasant and stress-free.
A little departure from the "plan"
I'll readily admit that I'm terribly scatterbrained (my oldest comes by that trait honestly!) and I can get sidetracked super easily. Especially when there's fabric involved. ;-)
So I took a bit of a break from the kids' stuff and the cleaning stuff and cut out a new skirt and top for *me*. I've got this amazing green eyelet and burgundy/brown/green batik fabric that jumped off the shelf and into my cart at the local Fabric Mega Mart.
The green eyelet will become this skirt:

And the batik will become the first top (but with the lower neckline):
 I don't plan on putting on a collar because I like a more streamlined look. Besides, the pattern of the fabric doesn't lend itself to any frippery. The only modification to this pattern was adding 1/2" to the waist to have enough ease. Cross your fingers that this works out because the fabric is $13/yard and I don't want to have to buy more.
More pictures will come as I complete more projects.
So I took a bit of a break from the kids' stuff and the cleaning stuff and cut out a new skirt and top for *me*. I've got this amazing green eyelet and burgundy/brown/green batik fabric that jumped off the shelf and into my cart at the local Fabric Mega Mart.
The green eyelet will become this skirt:

McCall's 5431
I added 2" to the waist at the center tapering to the hips. This pattern calls for a back zipper, but I don't like them, so I omitted the back seam and moved the opening to the side. This skirt is very close in style to my favorite skirt ever (DKNY, purchased in Jakarta 2.5 years ago). The length will be the same as the picture, but it will be solid eyelet without a contrast band. I'd rather have something that I can wear with more than one thing, ya know?

More pictures will come as I complete more projects.
Beach Party!


So off I went with my rotary cutter - my new best friend - and miles of fabric determined to make something awesomely awesome. Until I opened up the pattern. You see that lovely contrast band on the bodice up there? Guess what. It doesn't wrap around the back of the dress. It stops under the armpits. Now SRSLY folks. It's the DETAILS that matter and take an outfit to a "who' nuvah level". So what's a girl to do when faced by such a travesty? You got it. Redraft the pattern piece! Now don't get me wrong, I make no claims at being an "expert".


 While I was at it, I really wanted to give the new Bernina's zipper foot a run for it's money, so I opted for an "invisible" zipper. Now I've had mixed success with them in the past, largely owing to the fact that I didn't have a zipper foot. But hey, this machine came with one! So I had to try it out. And boy howdy does that thing work GREAT. See what I mean? A truly invisible zipper! And check out the matchy-matchy of the piping! SUCCESS!!!


A RANT: Separating the "men" from the "boys"
You've been warned. I just have to get this off my chest. You know how people who are well-versed in [a field] can't help but notice flaws in examples of [their field]?
Like the grammarian who can't help but notice the abuse of apostrophes, commas and so on...
Or the video/movie afficionado who screams "continuity!" or "focus!" at the screen...
Well, it also afflicts the seasoned sew-er. I can't bring myself to use the term "sewist" because it makes it sound like a religion. Anyhow, I suffer from this condition. I can't go out in public without scrutinizing hems for "blind" hem visibility or side seams for pattern mis-matching. How I wish that these things didn't pop out at me, but they do. It's almost a curse, really. I don't MEAN to judge your clothes. Honest. But it makes me want to poke my eyes out and run screaming away "ALLOW EXTRA FABRIC FOR PATTERN MATCHING!!!!!!!"
It has been pointed out to me on several occasions that this is what separates the couture (the men) from ready-to-wear (the boys). However, I don't believe that there is where the line is drawn. Because any given episode of Project Runway will show you that "designer" ≠ well-constructed or thought out. No matter how many times Tim Gunn says "make it work", you just KNOW that some seam somewhere is going to be awry or a pattern mismatched or SOMETHING. It's just the way the Universe works.
I know I shouldn't let this affect me this way, but it does. So much so, that I A) overbuy fabric "just to be sure" I have enough to match pattern repeats and B) spend HOURS making sure patterns are "just so" before constructing the garment(s) in question. And really, it's not something I'm proud of. Just like I'm not proud of wanting to scream at apostrophe abusers or whoever was in charge of continuity in whatever film it was I last saw that drove me nuts. Lord knows that my children don't appreciate my obsession over those details. At least I use my "powers" for good and not for evil. Besides, "they" took away my red marking pen. So abused apostrophes and misplaced commas are safe. For now.
The Countdown Cleaning Master!
As promised, here's the grand "plan" to get "perfectly" cleaned and organized in anticipation of our "Summer of Travel". Before I abuse any more apostrophes, on to the posting!
We have a small house by American standards. Weighing in at about 1425 square feet under heat/air, we're smaller than the average American home. In fact, we're smaller than the average home 40 years ago! That's what we get for being built in the 20s. Apparently, we're 1.5x the size of the average American home in the 1950s, too... However, for our neighborhood (platted out in the early 1900s and former orange grove), we're smack in the middle size.
 Our office/front hall were originally the front porch, to that expanded the house somewhat. Moving on from there, we've got a spacious living room that gives onto the dining room. The dining room's main feature is the window seat that really sold us on the house.
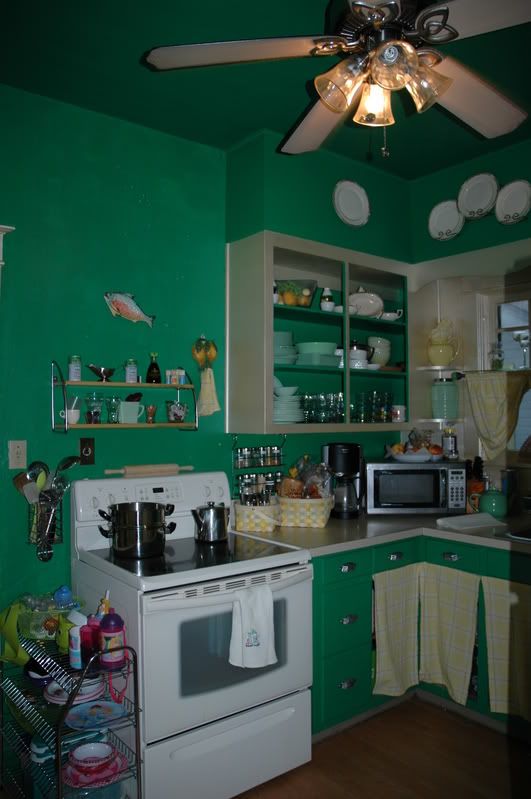
 From the front of the house there's our bedroom, the kids' rooms (ensuite) and at the end of the hall, the bathroom. In the 20s, this would've been considered a 3-bedroom home, but now it's considered 2 plus a "bonus" room.
We have a small house by American standards.
 Weighing in at about 1425 square feet under heat/air, we're smaller than the average American home. In fact, we're smaller than the average home 40 years ago! That's what we get for being built in the 20s. Apparently, we're 1.5x the size of the average American home in the 1950s, too... However, for our neighborhood (platted out in the early 1900s and former orange grove), we're smack in the middle size.Our office/front hall were originally the front porch, to that expanded the house somewhat. Moving on from there, we've got a spacious living room that gives onto the dining room. The dining room's main feature is the window seat that really sold us on the house.
 Beyond the dining room is the kitchen and back porch (laundry "room"). That is fully half the house. The dining room and living room both have doors that connect to the hallway.
From the front of the house there's our bedroom, the kids' rooms (ensuite) and at the end of the hall, the bathroom. In the 20s, this would've been considered a 3-bedroom home, but now it's considered 2 plus a "bonus" room.I can't believe that with all the repainting and stuff that I've done in the last few months that I don't have any current pics of the living and dining rooms. How bizarre! Anyhow, here's the plan. Working forward from the front hall to the laundry area and then back up the hallway by way of the bathroom and kids' rooms, I'm going to tackle everything. You might say "How on earth do you plan to do that?" and I'd reply "The same way you eat an elephant or repaint a house! One bite/room at a time."
Look for posts on:
- The Front Hall
- The Office
- The Living Room
- The Dining Room
- The Kitchen
- The Laundry Room
- The Bathroom
- The Girls' Room
- The Boy's Room
- The Hallway
- Our Room
I've got just over ten weeks to do it all, and more than ten areas to accomplish, so I have to bust this out faster than one room/week. Since this week is Spring Break, there's NO WAY I'm going to touch the kids' rooms. Not with an eleventy-million foot pole. That would just be an exercise in frustration and I'd be popping Zoloft like they were M&Ms.
What I will be doing is swallowing my pride and photo-journalling my progress. I really don't feel all that bad about it because, hey, even on my worst day EVER my house was never as bad as the "Messiest House In America". Not even close, no matter what my mom says. I've NEVER had an infestation of rodents and a flooded anything with 6' piles of crap. Because I'd have burnt it to the ground and started over. So before I lift a finger to clean, I'm going to haul out the Nikon D70 and document, document, document. And then, room by room, area by area, you'll see the transformation. I'll even throw in the "why" behind certain areas becoming "hot spots" for clutter. Heh. Never thought you'd see so much brutal honesty on a blog, didja?
I Love, I Love My Calendar...
With apologies to Neil Sedaka (I think) for co-opting the song title, I have a daily and weekly schedule in addition to a Google Calendar *and* a written monthly calendar that help keep me on the straight and narrow. Without them, I'd be sunk.
Some people can make do with just one calendar, but I'm so scatterbrained, I need at least four if not more.
My weekly schedule is broken down in one hour blocks:

This is my main schedule that I can edit as necessary based on activities and so on. I like to color code things so my eyes can pick out a particular activity rather quickly. You'll notice that the weekly calendar has quite a bit of "white space". That is filled up in the daily calendar for the most part.
My daily schedule is broken down in 15 minute increments:


I like it enough, the only problem with the Google Calendar is that when I add my husband to an event on the calendar, it synchs with his Outlook at work and it screws up their internal time scheduling for his group. Weird. But as far as sharing appointments and stuff? It's pretty efficient. I keep my Flylady tasks/zones in the sidebar on the right, but I still haven't figured out how to get it perfectly customized.
My fourth calendar is the el-cheapola dollar version from Target's "Dollar Spot". It looks something like this, but mine has lined blocks and a pretty robin's egg blue cover.

Some people can make do with just one calendar, but I'm so scatterbrained, I need at least four if not more.
My weekly schedule is broken down in one hour blocks:

This is my main schedule that I can edit as necessary based on activities and so on. I like to color code things so my eyes can pick out a particular activity rather quickly. You'll notice that the weekly calendar has quite a bit of "white space". That is filled up in the daily calendar for the most part.
My daily schedule is broken down in 15 minute increments:

I'm taking a page from Sophie Kinsella's novel (no pun intended) about the lawyer-turned-housecleaner. The main character's day was scheduled into 6 minute blocks for billing purposes. Back in the day, when I taught ballroom dancing, our days were scheduled in 45 minute blocks, so I figured I'd take the happy medium somewhere in between 6 and 45 minutes. 15 seemed to be the best for us. What you don't see on the daily calendar is my morning and evening Yoga/stretching. Whoops! I need to update the files. Speaking of which, I'd be very happy to share the excel files with anyone who wants them. Just leave a comment in the box. :-D
Here's a screenshot of my Google Calendar:

I like it enough, the only problem with the Google Calendar is that when I add my husband to an event on the calendar, it synchs with his Outlook at work and it screws up their internal time scheduling for his group. Weird. But as far as sharing appointments and stuff? It's pretty efficient. I keep my Flylady tasks/zones in the sidebar on the right, but I still haven't figured out how to get it perfectly customized.
My fourth calendar is the el-cheapola dollar version from Target's "Dollar Spot". It looks something like this, but mine has lined blocks and a pretty robin's egg blue cover.

I carry it with me everywhere so that I can jot down my appointments and whatnot. Back in the day when I had a working smartphone, I didn't need FOUR calendars. I had my smartphone. And it would synch with Outlook and I could synch my Excel calendars. But alas, it has died and gone to the great Cellphone Charger In The Sky.
So this is how I GET organized and (hopefullly) stay that way. Next post: "The Countdown Dance Cleaning Master's Spring Cleaning Challenge".
Sprung Has Spring
House must clean;
Kick up dust,
House clean must!
My apologies to Master Yoda.
It's officially the first day of spring in our household: Easter Sunday *and* the week of Spring Break. So in honor of rising to new life, the house must shed the detritus of the previous year and shine forth like a beacon of cleanliness. Or at least that's the plan.
I would say that I'm motivated simply because its spring. But that would be disingenuous. Reality is that I've got a mere ten weeks (!!!) until the house must be pristine and showroom ready. Anyone with small kids knows just what a daunting task that is!
- I've yet to put Christmas completely away
- The leftovers of Easter baskets are flung far and wide
- The living room is swathed in clean laundry
- Fabric scraps and cuttings abound in some of the WEIRDEST places
- Passport application expedited for middle child (I will not procrastinate on this again!)
- Once the passport arrives, overnight it to Indonesian embassy with Visa application
- Cook down the freezer
- Physical and Occupational Therapy for me
- Doctor appt for The Boy
- Doctor appts for me
- Sewing recital costumes
- Ordering picutres for school
- Finishing up the FHC dress and getting through the Sacramental prep program
- Two more Bernina mastery classes
- Home dec sewing classes at Joann's
- Middle Child's sewing classes as well
First Holy Communion Dress
So this is the year when my oldest daughter will make her First Holy Communion. [sigh] She's growing so fast. I can remember when... I'll stop before I turn into a maudlin mess.
I do believe that this dress and veil are most likely the most difficult project ever attemtpted. I'm terrified of expensive fabric. Purely terrified, I tell you. Before I cut into the dupioni silk and embroidered chiffon, I had to make a muslin. The story is over at Sew Retro. The finished muslin:

Here's a preview of the fabric for the actual dress:

I've pretty much finished the bodice and I'm about to get to work on the skirt. The dress is a Regency inspired item, although I've made a couple of modifications.
I do believe that this dress and veil are most likely the most difficult project ever attemtpted. I'm terrified of expensive fabric. Purely terrified, I tell you. Before I cut into the dupioni silk and embroidered chiffon, I had to make a muslin. The story is over at Sew Retro. The finished muslin:

Here's a preview of the fabric for the actual dress:
I've pretty much finished the bodice and I'm about to get to work on the skirt. The dress is a Regency inspired item, although I've made a couple of modifications.
- The sleeves are sheer
- Added a silk waistband with fancy braid trim
- Skirt is double layered with and embroidered chiffon overskirt
Sunday Supper: Raw Mushroom Soup
Adapted from the Simple Warm Live Mushroom Broth, With Ginger & Garlic recipe at LiveGreenSmoothieDiet.com.

I made some modifications to the recipe and it has a 5 out of 5 rating. I didn't tell my children what the broth was made from because I knew they would balk at it.
Reviews
I did sort of lie to them and call it "Secret Ingredient Soup" - an homage to Kung Fu Panda - but I don't think they cared. And well, since I did keep the main ingredient secret... Well...Oldest Child: YUM!Middle Child: TASTY!Youngest Child: I LOVE YOUR SOUP!!!11!!!!
But you, dear readers, will get the inside scoop on what makes this soup so amazing.
I started with one decent size King Oyster Mushroom.


Following the mushroom was 2 decent sized cloves of garlic, 1 teaspoon of sea salt, 4 teaspoons of Pearl River Bridge Superior Light Soy Sauce. I'm specifically calling out a particular brand of soy sauce for it's flavour and color. Next up was 1 tablespoon of Ginger Oil since I was flat out of fresh ginger. Which is practically a crime in an Asian household, I guess. Following on the heels of the Ginger Oil was Olive Oil (1 tbsp). I wanted to put some shallots in, but all mine had gone soft and ucky. So I substituted about 1/2 a small yellow organic onion minced. 4 cups of filtered water topped this melange off and away it went spinning around until everything was blended smooth.
I poured the lot into my saucepan and set it on med-high while I chopped up 3 baby portabella mushrooms, 1 green onion and the leftover heart of one head of organic baby lettuce. By the time my garnish was chopped, the soup was warm but not hot. I dished up and photographed the lot and called everyone to the table. Total time of prep to eating? 15 minutes. Now THAT is my kind of meal.

The neatest thing of all is that the soup is chock full of anti-inflammatory foods. And they're still raw, to boot! I'm getting back on my raw food journey this week and I though that this would be a great way to do so. I've come to the serious realization that when I eat conventional food, I get sick. My body starts to break down in a bad way. When I eat mostly raw and organic foods, I feel better. Gee, I wonder why...
Today's New Thing: Acai Berry juice. I got some sort of Acai/Pomegranate juice thing at the store since I've been hearing awesome stuff about it's anti-inflammatory, "superfood" status. Well, let me tell you what... That stuff is SWEET with a capital "If I don't cut this with water I'm going to end up in a diabetic coma" sweetness. SRSLY. 2-3 ounces of that madness with another 4-6 ounces of water makes it drinkable. And I'm a girl who LURVES that sugary goodness known as Southern Sweet Tea. So you KNOW that Acai berry stuff is suh-weet. Although, I must say that a mixture of 1 part Acai berry juice, 1 part water and 2 parts Sangria sure sounds tasty...
Subscribe to:
Comments (Atom)