Wearing History Pattern Test - Part IV

The pictures!
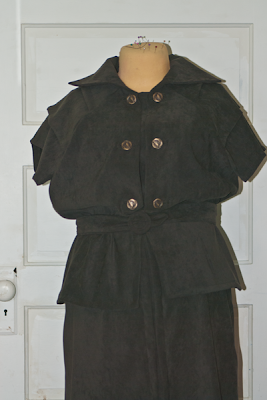
The full length view
aka The Robin Hood Dress

Dig those buttons - vintage repro!
and the belt which I scavenged and remade.

Wearing History Test Pattern - Part III

Whew! For all the fiddly aspects of the bodice, the skirt was a simple, straightforward and most importantly EASY finish. The peplum/skirt pieces went together perfectly smoothly. The pattern is so perfectly drafted that there are NO mistakes or fiddly bits at all in that part.

I have to say that I was cautiously optimistic about this section because it had the potential to go very, very wrong. Kudos to Lauren for excellent quality control on this. Pattern pieces that do not go together well is a MAJOR pet peeve of mine. That sort of hot mess has had me uttering words that no woman, child or small animal should EVER have to hear. Simplicity, I'm talkin' to you, here.

At this stage of the game, I've got the dress complete except for my totally awesome buttons being attached, the hem being finished and to steam it out because the fabric I used can't really be ironed. Drats. Next time...

Speaking of next time, I kinda really adore this pattern. Actually, adore isn't quite strong enough a word. I will definitely be making this dress again. Like next week. Hell is freezing over, peeps, because I'm making it in white. And I don't wear white ever. Not even at either of my weddings. Which, ironically, is why I'm making it in white. My marriage is being *officially* blessed in the Catholic Church {long story!} and so I wanted something somewhat bridal as it IS a big deal but I wasn't trying to squeeze myself into my vintage silk 1950s wedding dress. I'm so excited I could spit, actually.

So Wearing History is going to get a two-fer pattern review out of me on this one as the next one will be the long sleeved version.

Stay tuned, gentle readers, stay tuned!

And now for the legal yada yada:

*In the interest of full disclosure, I received this pattern for the express purpose of testing and I will be duly noting this in each subsequent post.

Crafturday Project Time - Live Fast and Dye Your Clothes

With apologies to Tish and Snooky of Manic Panic.

I whipped up a couple of those easy-to-do dresses from pre-smocked licensed fabric from the local Fabric Mega Mart for my girls and instead of doing ribbon ties like last time, I decided to make them into the dresses that just layer over a t-shirt. For modesty's sake, the girls wore matching stretch pants underneath.

Unfortunately, my younger child, despite me REALLY taking hers in is so skinny that her dress kept falling down around her waist. I had to find a solution, because I really like this look. I figured that if I got a tshirt and sewed it to the dress with a stretch stitch, it would work out fine. The problem? Where to get coordinating t-shirts/stretch pants for both girls? I checked my local Target because they have great prices on kids' clothing and I get 5% off with my Target Debit Card AND they give a percentage to our school. But woe was me that there wasn't something that really worked well.

Until I remembered that the Target tshirts for girls are super soft, contoured AND take dye like a dream. They are 100% cotton so it just works perfectly. I'd already done this twice before for other projects which I can NOT believe I didn't blog about. Holy cats!

The first was this outfit for my oldest - dyed with Dylon Ocean Blue

Custom lace appliques and beading
The second was the top to a pair of lounging pajamas for my middle child - dyed with Rit dye in Violet
Custom appliques
With both tops I did a bleed effect where the bottom edge was darker than the top. It's harder to tell with the blue top... 

For this project, I wanted coordinating leggings and tops to go with the dresses, so I just dumped the shirt/tights in the vat of dye and let them sit until they were close to the color I wanted.

Ariel dress got the shirt/tights dyed with Dylon's Bahama Blue which gives a light robin's egg hue. Rapunzel dress got the shirt/tights dyed with more of the Rit Violet which as you can see in the photo above gets pretty dark when left to sit for a while. I left the tshirts long inside the dresses to allow for a light barrier/modesty panel and for comfort as well. That faux smocked fabric is ITCHY on the inside and leaves marks.

The best thing about this project was that I already had the dye on hand from past projects so it didn't cost anything extra. The tshirts were $4.99 less 5% (thanks Target!) and the tights were $1.98 for 100% cotton on clearance (plus 5% off again).

Bonus Socks
Bonus socks from the cut offs of the tights. It's a win/win here, folks. And next time I'll actually publish the post on the day in question. This week was a weird one because it was Holy Week and I observed "radio silence" this past weekend on the blog front.

Wearing History Test Pattern - Part II

I've started the construction process and mostly finished the bodice of the short sleeved version.

 
I like to think I'm a pretty accomplished sewist, but the instructions that accompany this pattern are not necessarily intuitive. That's to be understood, though, considering that these are the original instructions from the 1930s and haven't been updated to more modern sewing processes.

 
My notes on the bodice construction:
  • If you are making the short sleeved version, the instructions for the short sleeves are on the last page rather than near the front even though the sleeves are one of the first parts that you are supposed to make.
  • The bound buttonholes are a total pain in the neck. AND the facing doesn't allow for them to be done all at once. The instructions call for pretty much the entire bodice to be constructed THEN deal with the facing/buttonhole dilemma. In the future, my advice is to mark the buttonhole position on BOTH the facing and the bodice front FIRST. Then, make machine buttonholes on the facing and do the bound buttonholes on the front. When making the bound buttonholes, don't stitch them down completely until you turn the facing. THEN you stitch around the bound buttonhole and machine buttonholes and everything is neatly done and fully encased, etc. This eliminates the need to slip stitch around the slashed buttonhles in the facing. It's not period authentic, but hey, it's a cleaner finish and will save time/thread.
  • Dealing with the "Vestee" was also counter intuitive. The illustration shows the top buttonholes with nothing to attach the buttons to. And the attachment of the vestee to the bodice was slightly strange. What I did was to hem the facings all the way around before adding the vestee and then I hemmed the top edge of the vestee before attaching. If you want, you could blind hem the top so the stitches don't show and you then don't have to slip stitch. I'm NOT a huge fan of hand sewing, so I will do anything at all to avoid it.
*In the interest of full disclosure, I received this pattern for the express purpose of testing and I will be duly noting this in each subsequent post.

Next up: The skirt and attaching the bodice

Surprise, Surprise, Surprise!


Guess what I found inside a 1930s vintage purse I picked up yesterday? Not money... I wish! But BETTER. Photographs of the owner (presumably). They're in terrible shape because of the age and lack of proper storage, but they are totally awesome just the same. Here's the pix as the looked straight out of the purse:

I'm going to attempt to restore them somewhat in Photoshop. Wish me luck! As a side note, I wear my hair the same way as the lady in the pictures. I wonder who she was and what the occasion was for the pictures and where did she get that purse? What dress and shoes did she pick it out for?

The Easter Frock

Vogue 8701 in fashion fabric. Normally I am SUCH a stickler for having my plaids/patterns match. You should ask my sewing instructor, Alexis, how long it took to cut out the fleece for a jacket in class at the local Fabric Mega Mart.

Yes, I know I'm nearly certifiable in that regard. I think it's the hyperfocus that goes along with being ADHD. Oh well, that's life, that's what they say, you're flying high in April...

Ahem. Frank Sinatra has left the building.

I've only got one gripe other than the pattern match where this iteration of the dress is concerned: the LINING. I understitched as directed, but my lining fabric is SO slippy that it will not stay put. When I make this dress again, and I will, I am going to change up the bodice construction a bit to ensure that the bodice lining doesn't roll up at the neck.

I used Gertie's narrow hem advice and it worked out well. For like the third or fourth time in a row now. I think she's on to something...

I've styled the look with my fabulous $4 shoes that I picked up from Ross about 3 Mother's Days ago. Yes, really. $4. On Clearance. And  perfect match to my go-to Sunday-Go-To-Meetin' dress. I love that dress because it's got an amazing vintage style, but honestly, after wearing it repeatedly for three years, I was getting sick of seeing it. It was my ONLY "nice" dress and was a bit more formal what with the sheer overlay and all... I'm not getting rid of it though, not by a long shot.

The other main accessory is my very real black pearl (no relation to the ship of the same name) from my mother-in-law. I have NO idea whatsoever what I will stick in my ears. Most likely my diamond studs which were a wedding gift from my late father-in-law and my mother-in-law back in 2000. They are just plain studs big enough to be seen but not big enough to put anyone's eyes out. They'll go nicely with the silver threads in the dress.

Wearing History - Test Pattern, Part I

I'm thrilled to testing Wearing History's, Tea At Two vintage reproduction pattern. Today I received it in the mail and will be testing Size Group B. In the interest of full disclosure, I received this pattern for the express purpose of testing and I will be duly noting this in each subsequent post. I don't want to run afoul of the FTC, nor do I want the lovely Lauren to either. I'm NOT going to follow in Martha's footsteps. ;-)

Today's project was to determine A) what view to make and B) what alterations needed to be made to the pattern to "make it work" for my shape/size. The largest size the pattern goes to is a 22, with measurements of 40-34-43 and mine vary considerably from those. I will be giving my edits to the pattern in both inches and centimeters, though, because I like working with cm because they can be much more precise (for me). Centimeters will appear in brackets [like so].

My measurements are 43-36-44 [109 / 91,5 / 111,75] (on a good day when I'm standing tall) and I'm a whopping 5'2" tall, so I will need to shorten the whole skirt by a good 1.5" [3,8]. The garment has a total of 7.25" [18,3] ease in the bust and 3/4" [2] in the waist/hip area for the largest size as drafted. I am not changing the bodice at all because the wearing ease that is built in will accomodate my chest just fine with a good 3" [7,6] to spare. The bodice lower edge is gathered to the waist, so it will not be *as* full on me, but that is OK. Another reason I'm NOT GOING THERE with changes to the bodice is that the sleeves are a bit more complicated to alter and I typically do not succeed with sleeve alterations. In fact, I typically have to go down a sleeve size or two to get them to fit right and not have me look like I'm wearing my mother's clothes to dress up in.

I added 5/8" [1,7] to each side seam of the waist which gives a bit more ease than the original pattern and accomodates my 2" larger waist. To the hip area, I added 7/8" [2,2] to accomodate my 1" larger hips and give a little more wiggle room. I tend to have a long stride, so I don't want to pop any seams if I have to dart after one of my children. I know that "ladies who dressed" didn't run after their children, but they didn't have my kids, either!

So far, I am very happy with the quality of the pattern received. I like the fact that it came on ONE continuous sheet of heavy duty paper. Typically, I either trace all my patterns or run them through the large format copier at Kinko's (spendy!!!) so that I can make my personalized edits. This saves me a HUGE amount of time and expense. The pattern has an MSRP of $22, but if I were to take a 99¢ "Big Four" pattern to Kinko's to copy onto the same type paper, it could EASILY run me the same price - if not more. So for value, Wearing History gets 4 ✂ out of a possible 4. Anything that saves me time and gas money is a win. One improvement I would make if at all possible is to have a "finished garment" measurement for the bust/waist/hip or an idea of  "garment ease". This might not be possible, but it would have saved me a good 30 minutes or more because I had to measure each pattern piece about eleventy times to make sure I got it right. Having that info handy to begin with would be less frustrating. However, since not every pattern available provides this info, I'm not counting off for it. :-D I might like a scootch more room between the skirt pieces and the ones directly next to them as my teeny alteration would run right into the piece directly adjacent, but again, NOT a ding against the pattern. If I were smaller around, this would SO not be an issue. And really, copying two pieces is not a deal breaker since I'm used to SO much more effort to get a usable pattern.

Next up will be the muslin attempt and fit concerns. After I find the fabric I intend to use for it...

Kicking the Malaise

I think that making the Vogue muslin really cleared the palate and got the creative juices flowing again. Today I graded Ladies Home Journal 1047 from 1933-35 up from a 28" waist to a 37" waist and made another wearable muslin.

Pattern Description: Ladies' long skirt
Pattern Sizing: Size 28/Waist 28

Did it look like the photo/drawing on the pattern envelope once you were done sewing with it? Suprisingly, yes. I wasn't sure at first, but it really did. Obviously when you're going up 9" in the waist, you're not going to look like the willowy illustration on the envelope.

Were the instructions easy to follow? Pretty much. There was one pattern piece that I couldn't make heads or tails of, so I omitted it without any functional issues.

What did you particularly like or dislike about the pattern? It's a good wardrobe staple and has gentle wearing ease. The instructions were my least favorite part of the pattern. They weren't terrible, they just assumed a lot.

Fabric Used: Some form of heavier cotton that was leftover from a project. This gave it a nice body.

Pattern alterations or any design changes you made: Graded up in size and changed seam allowances from 3/8" to 5/8". Omitted the "inner belt" in favor of a traditional lapped waistband.

Would you sew it again? Would you recommend it to others? Yes and Yes. I plan on redrafting it for sale as a repro pattern eventually with the modifications I've made to it.
 

Muslin Malaise

Have you ever ended up at the point in a project where you've hit a wall?

I'm sort of there right now. I conquered my nemesis pattern and it felt good, but afterward... well... there's this sense of "what now?"

I'd planned to make a 1944 Vogue vintage reissue suit and blouse with the nemesis pattern, but I needed to clear my head. So I decided to work on a more modern Vogue pattern that had a vintage feel.
I made the dress in the upper right corner of the image. Since I was making a muslin, I opted to use a thrifted twin size bed sheet and some leftover white cotton from my stash. I have to say, that the common thought that Vogue patterns are more complicated than others really is bogus. In my opinion, a modern Vogue pattern is far superior to their less expensive counterparts by the other Big Three pattern companies. Simplicity, I'm looking at YOU.

There was only one little quirk where I scratched my head a bit before proceeding. The sleeve cap/lining was a teeny bit tricky, but once I got it dealt with it was an a-ha! moment. From there on, it was extremely smooth sailing.

I started with a size 20 (bust 42") since that most accurately reflected my bust size and graded the waist up 3" to fit. However, this dress must have had a TON of ease, because after getting it together, the sleeves were 2" too wide at the shoulder and the bodice back was 2" too wide at the top of the zipper and 1" too wide at the waist. I probably could have used the size 18 pattern and graded the waist up a teeny bit rather than adding 3/4" to each side seam and then cutting it down again by 1" in the back.

Since I traced the pattern off, I'll just make my adjustments to the traced pattern and go from there when I'm ready to make my "real" version. For now, here's the *very* wearable muslin!

Blast from the past: McCall's 6074

Once upon a time I embarked on a Voyage to Vintage. I was full of plans and schemes and exuberance. I would collect vintage clothing items on ebay and vintage sewing patterns - all the while full of grandiose dreams of what I was going to do with them all. Newly married and in our first home together - built in 1921 - we were going to live the vintage life.

I collected FireKing Jadeite and Fiestaware and 78 records and so on. I tried to make my better half highwaisted pants, I bought Blyer wedges and we went to USO dances, but it never really clicked. Perhaps because we're not living in another era? I don't know. This post isn't really about my headspace, although I'd be willing to explore it at some other point.

My first experience sewing with a vintage pattern was McCall's 6074, a play suit. You may recall that I dubbed this one "The one that got away" because I'd thought I'd lost the pattern. Recently inspired to look in the one place I hadn't looked before, I found it, none the worse for wear. I actually did finish this in 2002 - roughly a year after starting it. By the time I'd finished it, I was pregnant with our first child and I converted it to a maternity playsuit by adding a wide elastic in the front waistband casing. At the time I'd put it together, I'd botched it pretty well and didn't know what I'd done, so adding an elastic waist seemed to be the best solution. It worked like a charm! I've only worn the outfit once though. And try as I might, neither I nor Hildegarde can fit into it. That was 9 years and {ahem} pounds ago.

I remember being pressed for time when I was finishing it to wear to our annual Easter Party at my aunt's house and so I totally cheated and used iron-on hem fastener or whatever it is it's called. I will say that 9 years later, the bond is still pretty good. No loose spots or anything. I must have had some trouble reading the pattern, though, because my sleeves don't have the cuff. Instead, it acts like a facing. Ahhhh.... How much I've learned in the intervening years!

One other "flaw" is that the pleats aren't nearly deep enough. I think that's where I went wrong with the waist. Maybe? I'm definitely going to put this pattern back into the rotation of things to make because I really love the look of it. I remember that when I made it, the bust fit *perfectly*. Ahhh jeunesse... Motherhood has taken it's toll on the mammaries (and other places)!

Pattern Description: Misses playsuit

Pattern Sizing: Size 18/Bust 36

Did it look like the photo/drawing on the pattern envelope once you were done sewing with it? YES! I was pleasantly surprised.

Were the instructions easy to follow? For an advanced sewist, yes. It's a printed pattern, but even so, I had trouble following it (the first time). At this point, I'd probably be able to breeze through it since my skill level has grown by leaps and bounds.

What did you particularly like or dislike about the pattern? I love the style. It's a fun alternative to tank tops and cargo shorts. I don't like that it doesn't have even the tiniest pocket. I love pockets.

Fabric Used: 100% Cotton.

Pattern alterations or any design changes you made: None

Would you sew it again? Would you recommend it to others? Yes and Yes! Except for that fact that I can only find one other one out in internet land for a hefty price... I might draft a repro version of this, though.

New direction to come?

I'm pondering this over at my other main blog, Musings from the Throne Room. I'm trying to figure out what goes where, and what direction to take. Bear with me!

Now that we've found love


My nemesis has been defeated and I've found that I actually LOVE the pattern. Crazy, huh?

I posted about it over at Sew Retro. Now that I've made the muslin and found success, I'm at a bit of a loss as to which project to complete next. Should I make the "official" blouse or try something else? I'm happy that I used one of the items in my "refashion" stack. Maybe I should try another refashion?

I've still got a mess of patterns left to log in my pile. Maybe I should do that instead?