This year for Halloween, my oldest child has decided she wants to dress up as Ariel. Which is no real surprise. She lurves her some Ariel. But the same-old same-old fins and a bikini top were just not going to happen here. So after Googling for some inspiration, I found this picture at DeviantArt.com.
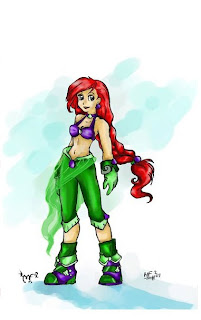 What makes this doubly cool is that not only is it Ariel with a Lara Croft twist, my daughter LOVES rpgs. Kingdom Hearts, specifically. So this is what Ariel would look like if she were the heroine of Kingdom Hearts. WIN! Until my daughter informed me that she would need the Crabclaw Keyblade.
What makes this doubly cool is that not only is it Ariel with a Lara Croft twist, my daughter LOVES rpgs. Kingdom Hearts, specifically. So this is what Ariel would look like if she were the heroine of Kingdom Hearts. WIN! Until my daughter informed me that she would need the Crabclaw Keyblade.GREAT! At least I’ve got about 6 weeks to scratch build it. I’m not a cosplayer, so this is uncharted territory for me. Don’t get me wrong, I LOVE cosplay, I just have never done it myself. So the next few tūts are going to be related to the Halloween costume. On with the tūt!

Like George Foreman isn’t going to pay a lot for a Meineke muffler, I’m not going to pay a lot for a costume prop. For an eight year old. I wouldn’t even do it for myself! So after a trip to the local Dollar Tree ($4) which included earbud covers for her Christmas gift and my local craft store ($11) I called it a day. I figure $13 is good enough for a custom weapon and parts of main costume.
I scored:
- Plastic sword - $1
- Disney princess chain bracelet with Ariel - $1
- 2 pack of mermaids - $1
- 2 cans of Valspar touch up paint in pink pearl/gold - 2@$1.99
- 3 sheets of self adhesive glitter foam - 3@$1.49
- 1 shell wooden thingy - 29¢
- 1 crab wooden thingy - 29¢

Step One – Cut a hole in the box
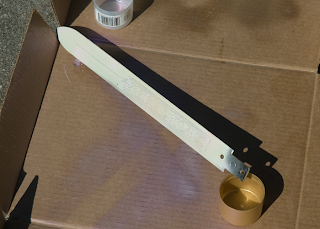
I scanned the crab into Photoshop at 200%, selected the crab image, deleted the background, put a 5px stroke around the crab image and printed it out to use as a template. Cut TWO from the RED glitter foam and set aside. Repeat the process for the shell. The size of your finished shell will depend largely on the size of your sword. In this case, size DOES matter.

Step Two – There’s so much we can do
Take the sword outside and spray the HILT only, the little mermaids and the chain from the bracelet only GOLD. Let them dry WELL. While they are drying, take the wooden shell and cut out TWO from the BLUE glitter foam. Set aside the shell template for later. You’ll use that again on the costume. Cut two larger shells from the template you made in the computer. Set aside. Once the sword is dry, spray the BLADE only with the pink pearl paint. I lucked out that my sword came apart by unscrewing 3 screws on the back side.

Step Three – It’s just you and me
Attach the crab and small shells to the blade and chain respectively. Match up the edges and use the self-adhesive of the foam to adhere it. I made a tiny hole using the pointy end of my trust Cinderella mechanical pencil and then made a slit to allow the chain through. Once the chain was inserted, I used a teeny dab of superglue to hold it together.


Step four – I can give you more
MUCH, much more! Check back next Tuesday for the boots! Meanwhile, check out the finished product!
